Using S3 Managed Uploads with Dropzone and OpenID to support very large file upload
The problem: flaky connections cause upload of large files to S3 to fail
Uploading files to S3 securely direct from a browser is a common pattern. There is plenty of information available on how to do this. Typically most examples documented online use standard S3 signed POST requests (either from direct from a html form or via an XHR request). This often means using some server side API call (which you need to build) to generate an AWS signed request, which can then be used in your web app client side. While being fairly easy to implement, for very large files a flaky connection or a dropped packet often means a failed upload and retries. What you need is multipart, chunked uploads that are resilient. However this is not trivial to achieve with S3.
The solution: secure chunked multipart managed uploads
If you use the AWS SDK there are essentially two routes. Use the S3 REST API and manage file chunks yourself. This is the low-level approach and is complex. Alternatively you can use the AWS SDK Managed Uploads API, in which the SDK does all the hard work for you to manage file chunking, upload, resilience, and the reconstruction of the file parts into a single S3 file at the end. However to use this you have to supply AWS credentials, and this is not something you typically want to expose client side. However, if your upload feature is behind some oAuth or OpenID authentication layer (as in my case, and I suspect is often the case if you are allowing uploads to your backend) then you are in business. You can setup AWS to work as OpenID Connect provider. Finally you need to integrate this with some client side file uploader library, such as Dropzone. I am going to demonstrate step-by-step how to :
a. Setup an S3 bucket to receive the uploads with a suitable access policy and CORS settings.
b. Setup AWS as an OpenID Connect provider for some external oAuth service - in this case Auth0.
c. Integrate AWS S3 Managed Uploads securely with Dropzone to handle multiple parallel resilient uploads for very large files, with progress bars, and cancel.
Step 1 - Create an S3 bucket
In your AWS tenancy, create an S3 bucket (e.g. my-bucket) and a CORS policy as follows.
<?xml version="1.0" encoding="UTF-8"?>
<CORSConfiguration xmlns="http://s3.amazonaws.com/doc/2006-03-01/">
<CORSRule>
    <!-- you can lock down the origin here if you wish -->
    <AllowedOrigin>*</AllowedOrigin>
    <AllowedMethod>HEAD</AllowedMethod>
    <AllowedMethod>GET</AllowedMethod>
    <AllowedMethod>PUT</AllowedMethod>
    <AllowedMethod>POST</AllowedMethod>
    <AllowedMethod>DELETE</AllowedMethod>
    <ExposeHeader>ETag</ExposeHeader>
    <ExposeHeader>x-amz-meta-custom-header</ExposeHeader>
    <ExposeHeader>x-amz-id-2</ExposeHeader>
    <ExposeHeader>x-amz-request-id</ExposeHeader>
    <ExposeHeader>Authorization</ExposeHeader>
    <AllowedHeader>*</AllowedHeader>
</CORSRule>
</CORSConfiguration>
You can revoke all public access to the bucket, as we will be writing to the bucket using an OpenID Connect user that has assumed an IAM Role with the correct policy to access the bucket.
Step 2 - Create an OpenID Connector Provider in AWS for Auth0
This allows us to use AWS as an intermediary for validating JWT OpenID tokens against an oAuth service, demonstrated here with Auth0.
Your web app users will authenticate (login) with Auth0 - The oAuth response from Auth0 authorize endpoint delivers an OpenID JWT token to the browser, which you typically store in localStorage for securing subsequent requests from the client to your backend.
To setup the AWS OpenID Connect provider you need the oAuth service root endpoint, and the oAuth application clientID. In Auth0 login to your dashboard and in your application settings you can get this info.
The oAuth endpoint is : https://{your-auth0-domain}/ (note the trailing slash), e.g. https://appname.auth0.com/
The application Client ID is a 32 character Base62 encoded string, e.g. 6sR4LF3UpznU4T26S3xRheGhjEKdni4H
Now login to your AWS tenancy, navigate to IAM account management > Identity Providers. Click on Create Provider, and enter the Auth0 details from above as follows, ensuring you add the trailing slash on the provider URL:

Then click Next and Create the provider.
Step 3 - Create an IAM Role for the OpenID Provider
Navigate to Policies in IAM, and create a new Policy as follows using the JSON editor, setting the correct name for {my-bucket}:
{
    "Version": "2012-10-17",
    "Statement": [
        {
            "Effect": "Allow",
            "Action": [
                "*"
            ],
            "Resource": [
                "arn:aws:s3:::{my-bucket}",
                "arn:aws:s3:::{my-bucket}/*"
            ]
        }
    ]
}
Note, this policy will grant the authenticated user assuming the role all actions on the bucket.. you may want to make this more restrictive. You could also add other AWS grants here too, so your user can access other AWS services if need be. Name your policy to something sensible, eg OpenIdS3Policy.
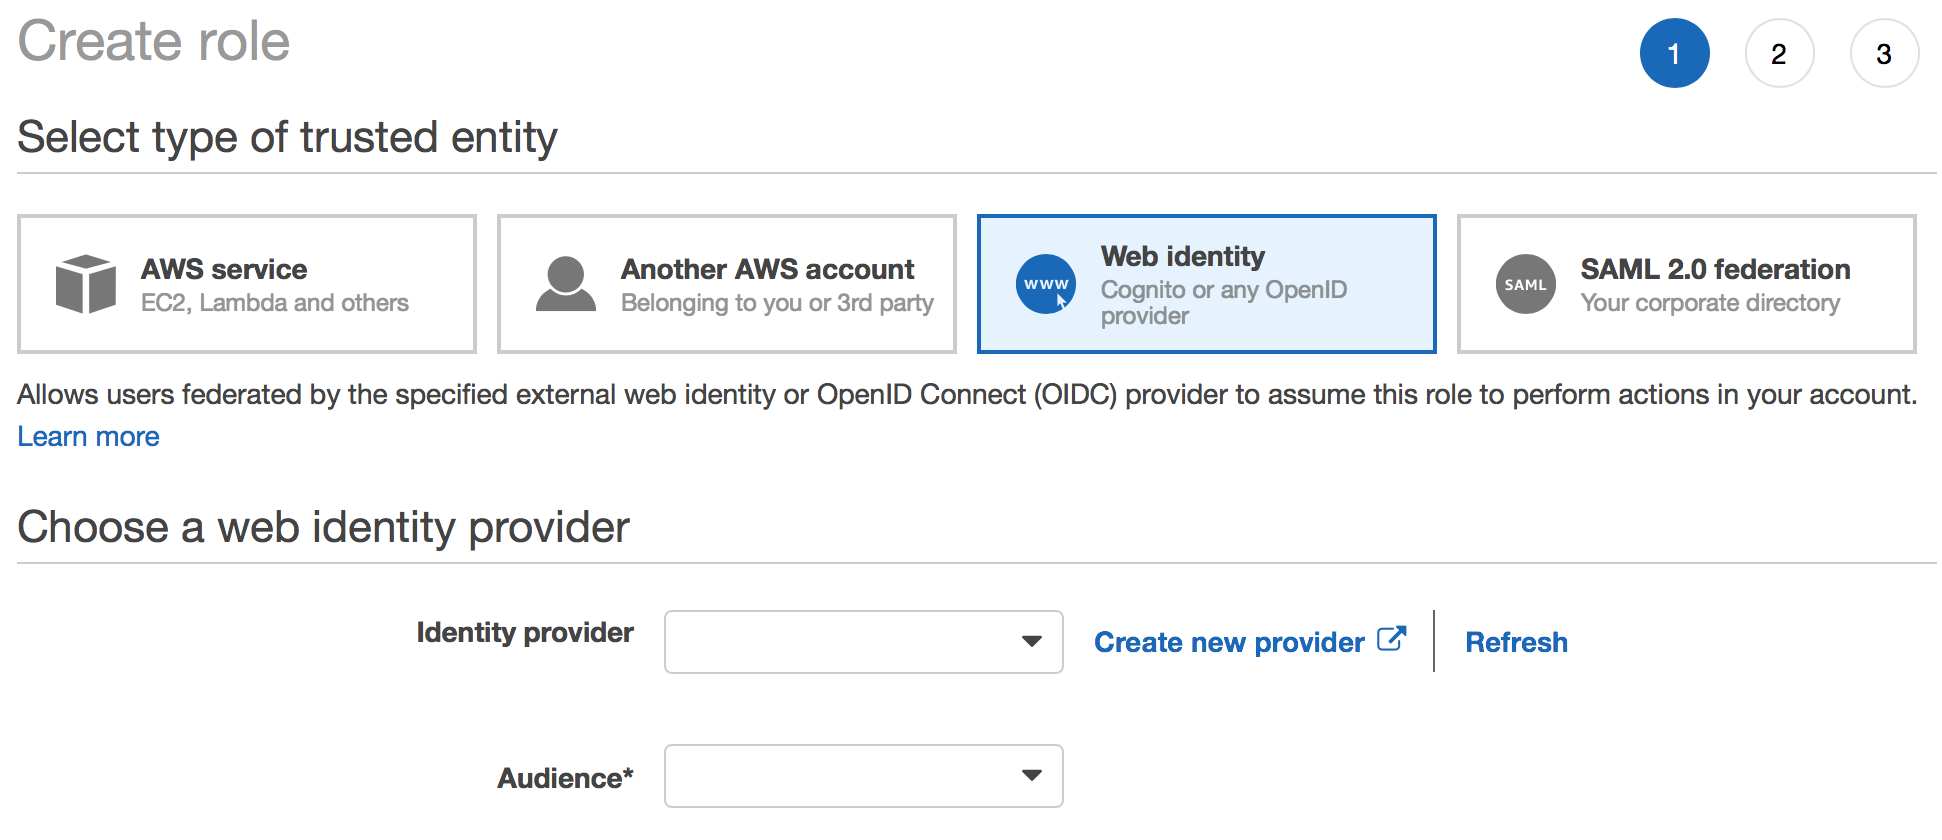
Now navigate to IAM Roles, and create a new Role. Choose Web Identity as below and choose your OpenID Provider you just created, and the Auth0 Client ID as the audience in the drop down options :
Next, Set the permissions of the role by choosing the OpenIdS3Policy created previously. It is easy to find your policy by selecting policy type Customer managed from the drop down. Save the Role with a suitable name eg OpenIdS3Role.
Step 4 - Grant access to the S3 bucket
Now we need to grant access to the S3 bucket for the IAM Role just created.
Copy the ARN for the Role, and navigate to your bucket setttings, and choose Bucket Policy. Add a Policy as follows, using the ARN for the role, and the correct bucket name :
{
  "Version": "2012-10-17",
  "Statement": [
    {
      "Sid": "Example permissions",
      "Effect": "Allow",
      "Principal": {
          "AWS": "arn:aws:iam::{my-AWS-Account-ID}:role/OpenIdS3Role"
      },
      "Action": [
          "s3:GetBucketLocation",
          "s3:ListBucket"
      ],
      "Resource": "arn:aws:s3:::{my-bucket}"
    },
    {
      "Effect": "Allow",
      "Principal": {
          "AWS": "arn:aws:iam::{my-AWS-Account-ID}:role/OpenIdS3Role"
      },
      "Action": [
          "s3:PutObject",
          "s3:GetObject",
          "s3:DeleteObject"
      ],
      "Resource": "arn:aws:s3:::{my-bucket}/*"
    }
  ]
}
That is all the AWS work needed. An authenticated OpenID Connect client can now access your S3 bucket by assuming the role of an IAM user. When the AWS connection is made, AWS authenticates the supplied JWT token against Auth0 using the AWS Identity Provider. Thus a user has to be logged into an Auth0 session to be able to access the bucket. AWS matches the aud value in the decoded JWT token with the trust relationship condition specified in the role we created. This is where the all important trailing slash I mentioned comes into play. This is an artefact of using Auth0 as an OpenID identity service. Auth0 adds a trailing slash to the aud value in the JWT token it generates. If we dont add the same, AWS cannot match the role with the token when it tries to assume the identity of the connecting user. If you use a different oAuth provider than Auth0 you may not need this trailing slash. Think of it as an Auth0 'gotcha'.
Step 5 - Integrate with Dropzone
Dropzone is one of the better, and widely used open source file upload JS libs. It is very customizable and mostly event driven so is easy to modify. Out of the box Dropzone uses XHR requests to send files to a remote server. We are going to override Dropzone's file uploading mechanism to use the AWS SDK Managed Upload API instead.
First, install (or make available) the AWS SDK in your web app, e.g.
npm install aws-sdk --saveNow define an accept callback function, that Dropzone invokes when a file has been accepted for upload. This lets us add an S3.ManagedUpload instance to the file object being queued by Dropzone for upload :
import S3 from 'aws-sdk/clients/s3';

function acceptCallback(file, done) {
  // options for the managed upload for this accepted file
  // define the bucket, and the S3 key the file will be stored as
  var params = {Bucket: 'my-bucket', Key: file.name, Body: file};
  // add an S3 managed upload instance to the file
  file.s3upload = new S3.ManagedUpload({params: params});
  done();
}
Now we need to override the Dropzone uploadFiles function to upload via the AWS SDK instead of XHR. Note we are using the file.s3upload instance we added to the file object when the file was accepted by Dropzone. We emit Dropzone events on success and failure, and we also listen to the AWS httpUploadProgress event, and emit the equivalent Dropzone event, so Dropzone can render upload progress for each file :
// override the uploadFiles function to send via AWS SDK instead of xhr
Dropzone.prototype.uploadFiles = function (files) {
  for (var j = 0; j < files.length; j++) {
    var file = files[j];
    sendFile(file);
  }
};

function sendFile(file) {
  file.s3upload.send(function(err, data) {
    if (err) {
      theDropzone.emit("error", file, err.message);
    } else {
      theDropzone.emit("complete", file);
    }
  });

  // listen to the AWS httpUploadProgress event, and emit an equivalent Dropzone event
  file.s3upload.on('httpUploadProgress', function(progress) {
    if (progress.total) {
      var percent = ((progress.loaded * 100) / progress.total);
      theDropzone.emit('uploadprogress', file, percent, progress.loaded);
    }
  });
}
If we want our users to be able to Cancel uploads mid-progress we need to implement an abort function that can be invoked on the Dropzone canceled event :
function abortUpload(file) {
  if (file.s3upload) file.s3upload.abort();
}
Finally you need to initialize your Dropzone on some DOM element on your page and
setup AWS Credentials for the S3 managed uploads. To do this we create an AWS.WebIdentityCredentials object using the ARN of the IAM role we created in Step 3, and also inject the JWT ID token from your local storage/session - the token returned by the Auth0 client side authentication workflow. When we initialize Dropzone we also set up the accept and canceled event callbacks.
import AWS from 'aws-sdk/global';
import S3 from 'aws-sdk/clients/s3';

function initializeDropzone(dropzoneElement) {

  var idToken =  'your-jwt-openId-token'; // get from local storage/session
  AWS.config.credentials = new AWS.WebIdentityCredentials({
    RoleArn: 'arn:aws:iam::{my-AWS-Account-ID}:role/OpenIdS3Role',
    WebIdentityToken: idToken
  });

  theDropzone = new Dropzone(dropzoneElement, {
    autoQueue: false, // if you want to manually trigger uploads
    accept: acceptCallback,
    canceled : abortUpload,
    init: function () {
      this.on('removedfile', function (file) {
        abortUpload(file)
      })
    }
  })
};
All done. In these examples, I have shown the minimum you need to do to get S3 Managed Uploads working with, for example, the Boostrap Dropzone demo here. There are of course lots more features of Dropzone you can implement, but this should be sufficient to for you to build fully resilient secure S3 uploads using Dropzone and OpenID authentication for very large files.